
Prerequites
https://www.pixelite.co.nz/article/add-prismjs-to-ghost/
```python print("nice snippet") ```
print("nice snippet")netstat -nlpt
</p><pre><code class="language-markdown"> ```python print("nice snippet") ``` </code></pre><p>
In this post, we'll spin up docker containers for the Hashicorp's Vault and Consul on MacOS.
At the end of this post, we'll have a file structure similar to the following:
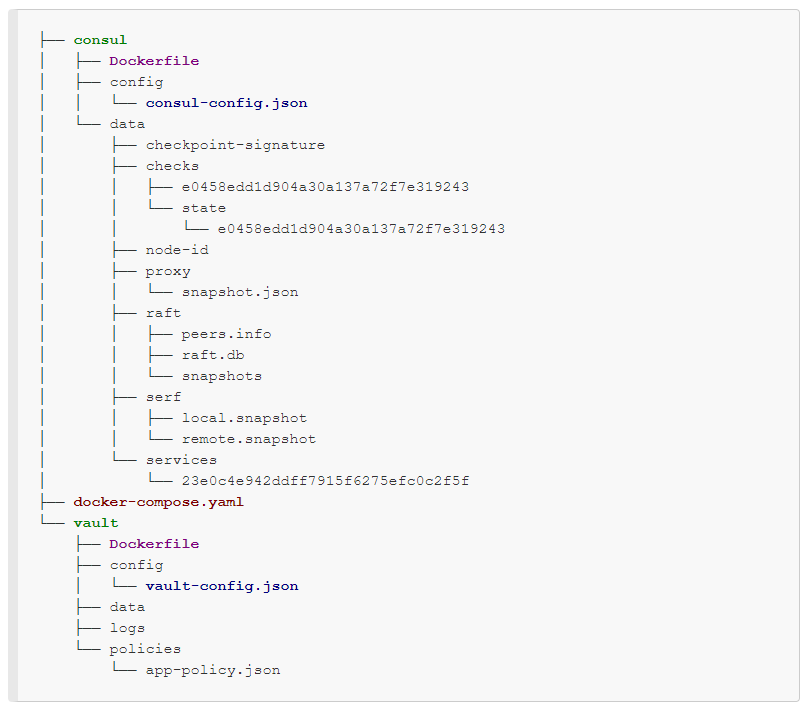
Looks complicated, however, we do not need all of them. To start Vault server with Filesystem backend (not Consul backend), we need only the following 3 files:
- ./docker-compose.yaml
- ./vault/Dockerfile
- ./vault/config/vault-config.json
We'll start by running a single instance of Vault within a Docker container and then play with both static (Docker Compose - Hashicorp's Vault and Consul Part A (install vault, unsealing, static secrets, and policies)) and dynamic secrets, and then see how Vault's "encryption as a service (EaaS)" feature (Docker Compose - Hashicorp's Vault and Consul Part B (EaaS, dynamic secrets, leases, and revocation)). Then, we'll add a Consul into the mix and look at how to scale Vault (Docker Compose - Hashicorp's Vault and Consul Part C (Consul)).
For those exercises, we need to have docker and docker-compose installed.
We're going to use docker-compose to deploy the vault and consul containers which is a orchestration tool for multi-container Docker services:$ sudo pip install docker-compose
</p>
    <pre>
        <code class="language-markdown">
        ```python
        print("nice snippet")
        ```
        </code>
    </pre>
<p>
```python
print("nice snippet")
`````` pre { background-color: #f4f4f4; max-width: 100%; overflow: auto; } ```
$ mkdir Vault-Consul-Docker $ cd Vault-Consul-Docker/
``` pre { background-color: #f4f4f4; max-width: 100%; overflow: auto; } ```
This will produce the following gray look:
Filesystem Backend
To set up things quickly, we'll use the Filesystem backend to store secrets at rest.
The Filesystem storage backend stores Vault's data on the filesystem using a standard directory structure. It can be used for durable single server situations, or to develop locally where durability is not critical.
Note that it's for local development or single-server Vault deployment since it does not support high availability. Though it is officially supported by HashiCorp
orchestration tool for multi-container Docker services:$ sudo pip install docker-compose
├── consul│ ├── Dockerfile│ ├── config │ │ └── consul-config.json│ └── data │ ├── checkpoint-signature │ ├── checks │ │ ├── e0458edd1d904a30a137a72f7e319243 │ │ └── state │ │ └── e0458edd1d904a30a137a72f7e319243 │ ├── node-id │ ├── proxy │ │ └── snapshot.json │ ├── raft │ │ ├── peers.info │ │ ├── raft.db │ │ └── snapshots │ ├── serf │ │ ├── local.snapshot │ │ └── remote.snapshot │ └── services │ └── 23e0c4e942ddff7915f6275efc0c2f5f ├── docker-compose.yaml└── vault ├── Dockerfile ├── config │ └── vault-config.json ├── data ├── logs └── policies └── app-policy.json
Let's make our project directory and cd into it:
$ mkdir Vault-Consul-Docker $ cd Vault-Consul-Docker/
Then, add the following folders to the project directory:
Vault-Consul-Docker/ └── vault ├── config ├── data ├── logs └── policies
```css pre { background-color: #f4f4f4; max-width: 100%; overflow: auto; } ```
Create a vault/Dockerfile:
'''css pre { background-color: #f4f4f4; max-width: 100%; overflow: auto; } '''
# base image FROM alpine:3.7 # set vault version ENV VAULT_VERSION 0.10.3 # create a new directory RUN mkdir /vault # download dependencies RUN apk --no-cache add \ bash \ ca-certificates \ wget # download and set up vault RUN wget --quiet --output-document=/tmp/vault.zip https://releases.hashicorp.com/vault/${VAULT_VERSION}/vault_${VAULT_VERSION}_linux_amd64.zip && \ unzip /tmp/vault.zip -d /vault && \ rm -f /tmp/vault.zip && \ chmod +x /vault # update PATH ENV PATH="PATH=$PATH:$PWD/vault" # add the config file COPY ./config/vault-config.json /vault/config/vault-config.json # expose port 8200 EXPOSE 8200 # run vault ENTRYPOINT ["vault"]
```
Then make a docker-compose.yml file to the project root:
version: '3.6' services: vault: build: context: ./vault dockerfile: Dockerfile ports: - 8200:8200 volumes: - ./vault/config:/vault/config - ./vault/policies:/vault/policies - ./vault/data:/vault/data - ./vault/logs:/vault/logs environment: - VAULT_ADDR=http://127.0.0.1:8200 command: server -config=/vault/config/vault-config.json cap_add: - IPC_LOCK
We also need vault/config/vault-config.json file:
{ "backend": { "file": { "path": "vault/data" } }, "listener": { "tcp":{ "address": "0.0.0.0:8200", "tls_disable": 1 } }, "ui": true }
Here, we configured Vault to use the Filesystem backend, defined the listener for Vault, disabled TLS, and enabled the Vault UI.
. ├── docker-compose.yaml └── vault ├── Dockerfile ├── config │ └── vault-config.json ├── data ├── logs └── policies
Now we can build the image and spin up the container in a detached mode. Run the following from our project directory
$ docker-compose up -d --buildBuilding vault Step 1/9 : FROM alpine:3.7 ---> 6d1ef012b567 Step 2/9 : ENV VAULT_VERSION 0.10.3 ---> Using cache ---> 7085773193b7 Step 3/9 : RUN mkdir /vault ---> Using cache ---> 9f7801dd4803 Step 4/9 : RUN apk --no-cache add bash ca-certificates wget ---> Using cache ---> 69e4556cabdb Step 5/9 : RUN wget --quiet --output-document=/tmp/vault.zip https://releases.hashicorp.com/vault/${VAULT_VERSION}/vault_${VAULT_VERSION}_linux_amd64.zip && unzip /tmp/vault.zip -d /vault && rm -f /tmp/vault.zip && chmod +x /vault ---> Using cache ---> 617e25f51df3 Step 6/9 : ENV PATH="PATH=$PATH:$PWD/vault" ---> Using cache ---> 9bb56b39a843 Step 7/9 : COPY ./config/vault-config.json /vault/config/vault-config.json ---> d0dae39d6bf4 Step 8/9 : EXPOSE 8200 ---> Running in 50dad229b2fb Removing intermediate container 50dad229b2fb ---> 36a9ce798f1f Step 9/9 : ENTRYPOINT ["vault"] ---> Running in 85d57ba68f2d Removing intermediate container 85d57ba68f2d ---> 4020402b9dcf Successfully built 4020402b9dcf Successfully tagged vault-consul-docker_vault:latest Creating vault-consul-docker_vault_1 ... done $ docker psCONTAINER ID IMAGE COMMAND CREATED STATUS PORTS NAMES bfa8240b20d5 vault-consul-docker_vault "vault server -confi…" 2 minutes ago Up 2 minutes 0.0.0.0:8200->8200/tcp vault-consul-docker_vault_1
Initializing and Unsealing
Start a bash session within the running container:
$ docker-compose exec vault bashbash-4.4#
Within the shell, initialize Vault:
# vault operator initUnseal Key 1: p9ySCyRaHXUhQQAw3PgkQhSvoe+mexRlZGILDi2ieLji Unseal Key 2: a8IQbNnbUWLx5mK//nkG0NIO4XtYbeqOFnS7R1STJhQg Unseal Key 3: 4Q+qgYNYTRqER5NdrzFwyYSmI6ZcQ4qYcvat0YKCGqJBUnseal Key 4: AlXy7LO1Nyxxp5GAVYe2MEusk8chXJb/q0rnT5hxOsB6Unseal Key 5: XHtoC4husOQCwXNEyT4Du6D9zF6T2UJgEWVRoCC/62kr Initial Root Token: 213d7dad-c2fd-de83-61bf-bcc9ab43d480 Vault initialized with 5 key shares and a key threshold of 3. Please securely distribute the key shares printed above. When the Vault is re-sealed, restarted, or stopped, you must supply at least 3 of these keys to unseal it before it can start servicing requests. Vault does not store the generated master key. Without at least 3 key to reconstruct the master key, Vault will remain permanently sealed! It is possible to generate new unseal keys, provided you have a quorum of existing unseal keys shares. See "vault operator rekey" for more information.
The vault operator init command initializes a Vault server. Initialization is the process by which Vault's storage backend is prepared to receive data.
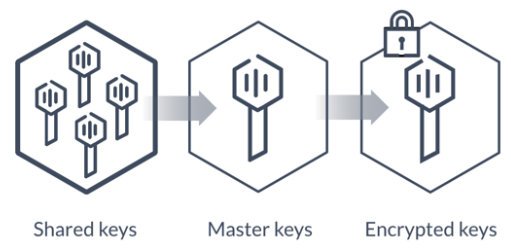
During initialization, Vault generates an in-memory master key and applies Shamir's secret sharing algorithm to disassemble that master key into a configuration number of key shares such that a configurable subset of those key shares must come together to regenerate the master key. In other words, instead of distributing this master key as a single key to an operator, Vault uses an algorithm known as Shamir's Secret Sharing to split the key into shards.
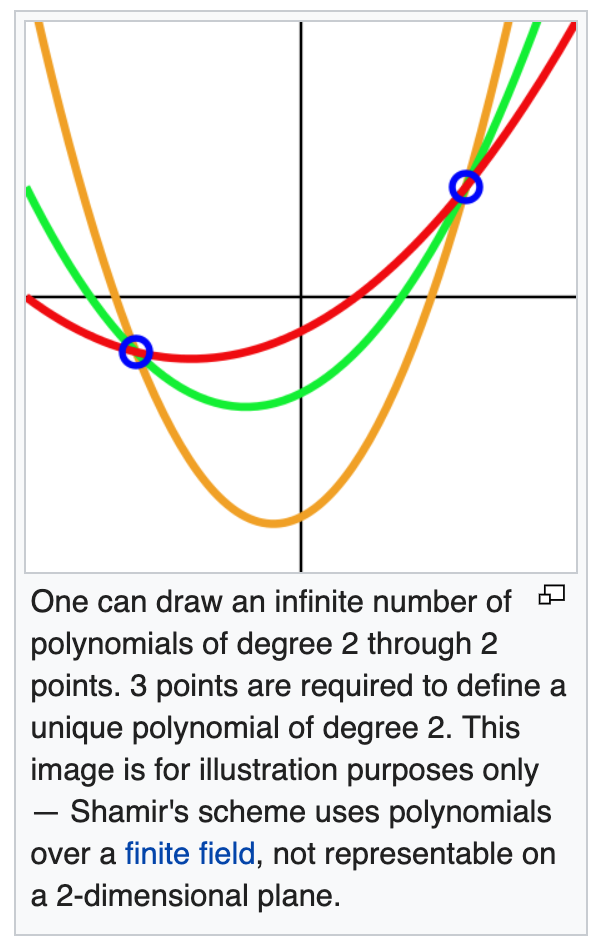
A certain threshold of shards is required to reconstruct the master key.
These keys are often called unseal keys in Vault's documentation. When the Vault server is started, it must be provided with a storage backend so that data is available across restarts. Once started, the Vault is in a sealed state.
In a sealed state, even though Vault is configured to know where and how to access the physical storage, it doesn't know how to decrypt any of it. Unsealing is the process of constructing the master key necessary to read the decryption key to decrypt the data, allowing access to the Vault.
Before any operation can be performed on the Vault it must be unsealed.
Note that vault operator init command cannot be run against already-initialized Vault cluster.
Take note of the unseal keys and the initial root token. We will need to provide three of the unseal keys every time the Vault server is re-sealed or restarted.
Now we can unseal Vault using three of the keys:
bash-4.4# vault operator unseal 4Q+qgYNYTRqER5NdrzFwyYSmI6ZcQ4qYcvat0YKCGqJBKey Value --- ----- Seal Type shamir Sealed trueTotal Shares 5 Threshold 3 Version 0.10.3 Cluster Name vault-cluster-7358692f Cluster ID 4a546e14-2781-6057-a9f6-46cce8f34940 HA Enabled false bash-4.4# vault operator unseal AlXy7LO1Nyxxp5GAVYe2MEusk8chXJb/q0rnT5hxOsB6Key Value --- ----- Seal Type shamir Sealed trueTotal Shares 5 Threshold 3 Version 0.10.3 Cluster Name vault-cluster-7358692f Cluster ID 4a546e14-2781-6057-a9f6-46cce8f34940 HA Enabled false bash-4.4# vault operator unseal Unseal Key (will be hidden): Key Value --- ----- Seal Type shamir Sealed falseTotal Shares 5 Threshold 3 Version 0.10.3 Cluster Name vault-cluster-7358692f Cluster ID 4a546e14-2781-6057-a9f6-46cce8f34940 HA Enabled false
The vault operator unseal allows the user to provide a portion of the master key to unseal a Vault server. As mentioned earlier, Vault starts in a sealed state.
We want to make sure Sealed is false.
For the first two, we put the keys in command line. For the third one, we put it into the prompt.
Once a Vault is unsealed, it remains unsealed until one of two things happens: either it is resealed via the API (see below) or the server is restarted.
Before a Vault client can interact with Vault, it must authenticate against one of the auth methods (GitHub, LDAP, AppRole, etc.). Authentication works by verifying our identity and then generating a token to associate with that identity.
All external authentication mechanisms, such as GitHub, map down to dynamically created tokens. Within Vault, tokens map to information. The most important information mapped to a token is a set of one or more attached policies. These policies control what the token holder is allowed to do within Vault.
Let's authenticate using the root token:
bash-4.4# vault login 213d7dad-c2fd-de83-61bf-bcc9ab43d480Success! You are now authenticated. The token information displayed below is already stored in the token helper. You do NOT need to run "vault login" again. Future Vault requests will automatically use this token. Key Value --- ----- token 213d7dad-c2fd-de83-61bf-bcc9ab43d480 token_accessor e97c34c2-5e3c-f004-4682-f9dccc4e517c token_duration ∞ token_renewable false token_policies ["root"] identity_policies [] policies ["root"] bash-4.4#
Vault is now unsealed and ready for use!
This unseal process is done by running vault operator unseal or via the API. Typically, multiple operators are required to unseal Vault, each providing their part of the shared secret, as part of a manual process. Some organizations build tooling to automate or semi-automate this process using the Vault API or command line, but doing so in a secure and operationally sound manner is not trivial.
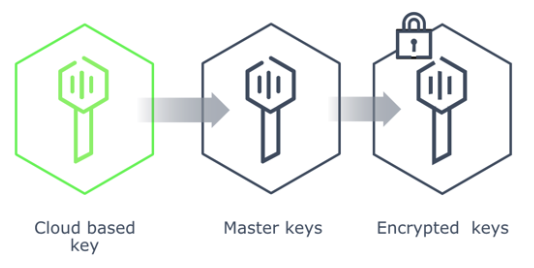
Auto unseal was developed to aid in reducing the operational complexity of unsealing Vault while keeping the master key secure. This feature delegates the responsibility of securing the master key from operators to a trusted device or service. Instead of only constructing the key in memory, the master key is encrypted with a cloud-based Key Management System (KMS) or an on-premises Hardware Security Module (HSM) and then stored in the storage backend allowing Vault to decrypt the master key at startup and unseal automatically. This eliminates the need for multiple operators or agents to provide parts of the shared key in either a manual or custom-built automated process.
For more on the auto unseal, see Enabling Cloud-based Auto Unseal in Vault Open Source
Auditing
First, we need to enable an Audit Device which keeps a detailed log of all requests and response to Vault:
bash-4.4# vault audit enable file file_path=/vault/logs/audit.logSuccess! Enabled the file audit device at: file/
We should now be able to view the logs locally in "vault/logs". To test, run the following command to view all enabled Audit Devices:
bash-4.4# vault audit listPath Type Description ---- ---- ----------- file/ file n/a
The request and subsequent response should be logged in vault/logs/audit.log.
Secrets
There are two types of secrets in Vault:
- Static secrets (think encrypted Redis or Memcached) have refresh intervals but they do not expire unless explicitly revoked. They are defined ahead of time with the Key/Value backend (formerly the "generic" backend) and then shared.
- Dynamic secrets are generated on demand. They have enforced leases and generally expire after a short period of time. Since they do not exist until they are accessed, there's less exposure - so dynamic secrets are much more secure. Vault ships with a number of dynamic backends - i.e., AWS, Databases, Google Cloud, Consul, and RabbitMQ.
Static Secrets - CLI
Still within the bash session in the container, we can create, read, update, and delete secrets. We'll also look at how to version and roll back secrets.
Create a new secret with a key of bar and value of precious within the secret/foo path:
bash-4.4# vault kv put secret/foo bar=preciousSuccess! Data written to: secret/foo
To read it back:
bash-4.4# vault kv get secret/foo=== Data === Key Value --- ----- bar precious
To work with different versions of a specific key, we'll need to upgrade to v2 of the Key/Value backend:
bash-4.4# vault kv enable-versioning secret/Success! Tuned the secrets engine at: secret/
Add version 2 by updating the value to copper:
bash-4.4# vault kv put secret/foo bar=copperKey Value --- ----- created_time 2019-05-17T18:57:25.4669637Z deletion_time n/a destroyed false version 2
To read version 1:
bash-4.4# vault kv get -version=1 secret/foo====== Metadata ====== Key Value --- ----- created_time 2019-05-17T18:56:03.1635968Z deletion_time n/a destroyed false version 1 === Data === Key Value --- ----- bar precious
To read version 2:
bash-4.4# vault kv get -version=2 secret/foo====== Metadata ====== Key Value --- ----- created_time 2019-05-17T18:57:25.4669637Z deletion_time n/a destroyed false version 2 === Data === Key Value --- ----- bar copper
To delete the latest version (e.g., version 2):
bash-4.4# vault kv delete secret/fooSuccess! Data deleted (if it existed) at: secret/foo
To delete version 1:
bash-4.4# vault kv delete -versions=1 secret/fooSuccess! Data deleted (if it existed) at: secret/foo
We can undelete as well:
bash-4.4# vault kv undelete -versions=1 secret/fooSuccess! Data written to: secret/undelete/foo
Delete is similar to a soft delete. If we want to remove the underlying metadata, we'll have to use the destroy command:
bash-4.4# vault kv destroy -versions=1 secret/fooSuccess! Data written to: secret/destroy/foo
Static Secrets - API
We can also interact with Vault via the HTTP API. We'll making requests against v2 of the API.
Open a new terminal tab, and then set the root token as an environment variable:
$ export VAULT_TOKEN=213d7dad-c2fd-de83-61bf-bcc9ab43d480
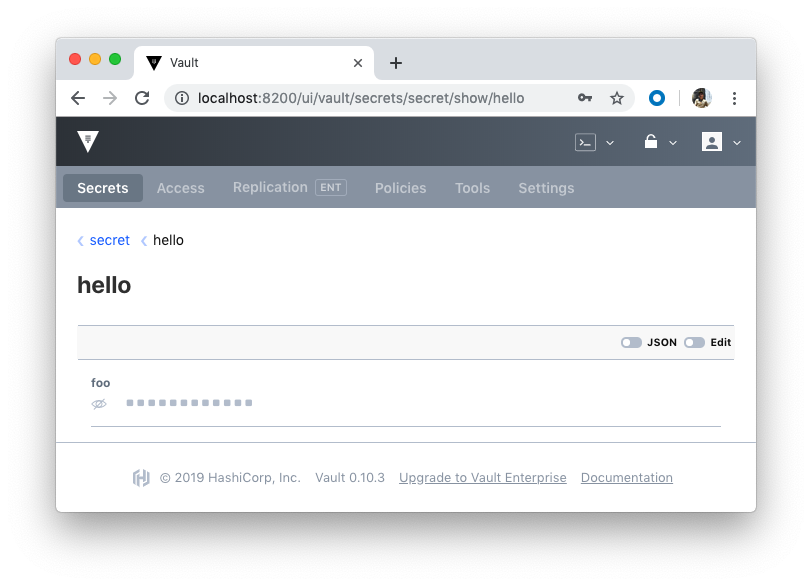
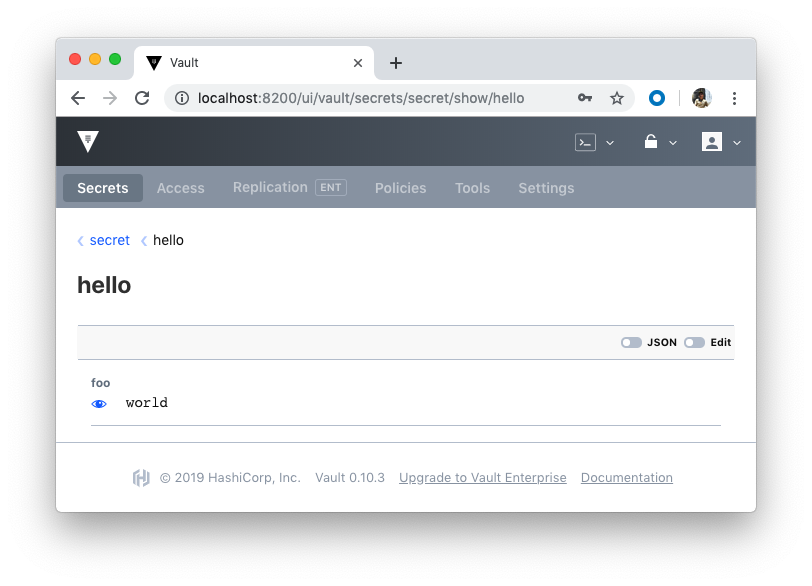
Let's create a new secret called foo with a value of world:
$ curl \ > -H "X-Vault-Token: $VAULT_TOKEN" \ > -H "Content-Type: application/json" \ > -X POST \ > -d '{ "data": { "foo": "world" } }' \ > http://127.0.0.1:8200/v1/secret/data/hello{ "request_id":"23ff3238-6d80-4b30-0045-1a278ca6c2f8", "lease_id":"", "renewable":false, "lease_duration":0, "data":{ "created_time":"2019-05-17T19:14:46.7004808Z", "deletion_time":"", "destroyed":false, "version":1 }, "wrap_info":null, "warnings":null, "auth":null }
To read the secret:
$ curl \ > -H "X-Vault-Token: $VAULT_TOKEN" \ > -X GET \ > http://127.0.0.1:8200/v1/secret/data/hello{ "request_id":"73889392-e13a-898e-eca6-f0432f9e6994", "lease_id":"", "renewable":false, "lease_duration":0, "data":{ "data":{"foo":"world"}, "metadata":{ "created_time":"2019-05-17T19:14:46.7004808Z", "deletion_time":"", "destroyed":false, "version":1} }, "wrap_info":null, "warnings":null, "auth":null }
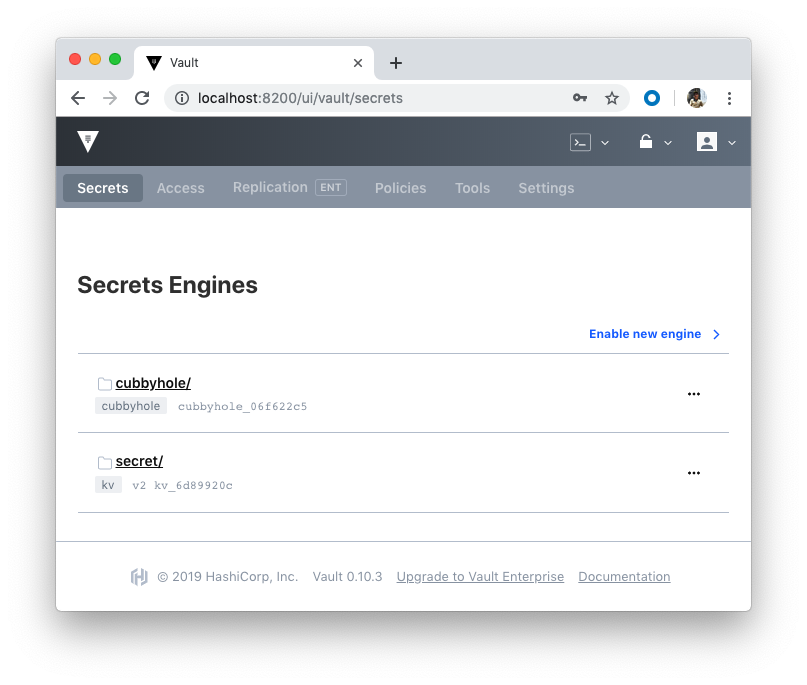
Static Secrets - UI
The UI should be up at running at http://localhost:8200/ui/vault. Using the root token to login, we can explore the Key/Value backend:
Policies
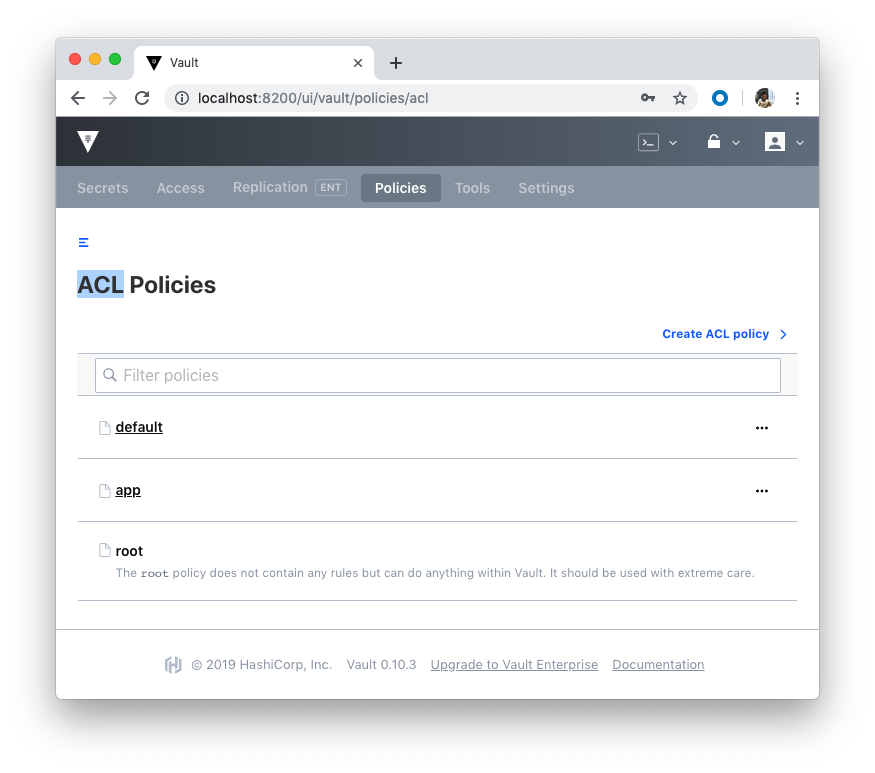
So far, we've been using the root policy to interact with the API.
Now, let's set up a policy that only has read access.
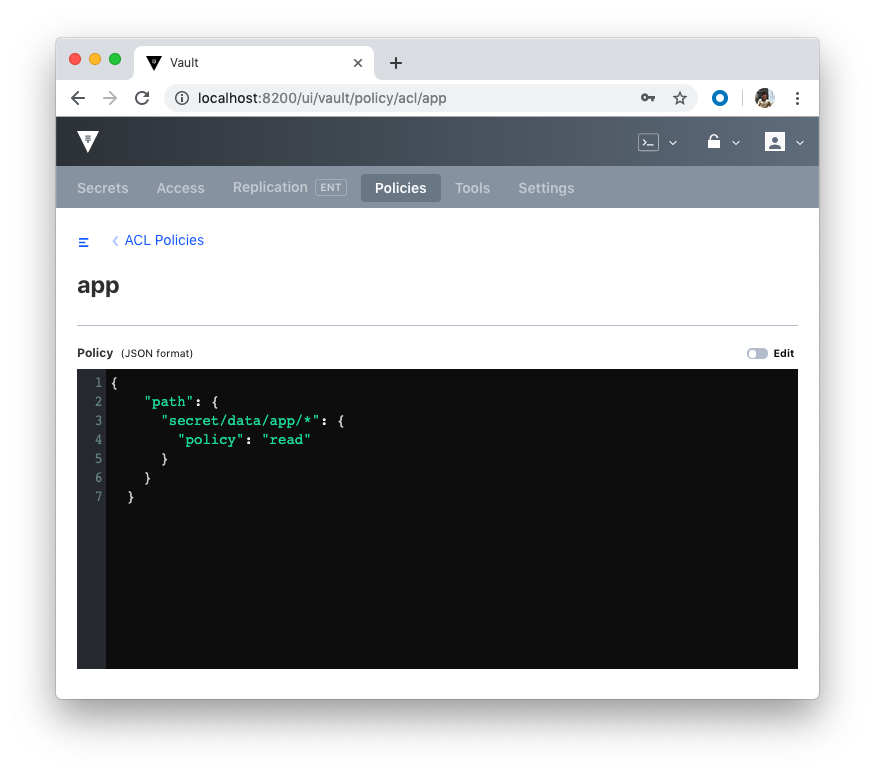
Add a new config file called vault/policies/app-policy.json:
{ "path": { "secret/data/app/*": { "policy": "read" } } }
We need to create a new policy back in the bash session:
bash-4.4# vault policy write app /vault/policies/app-policy.jsonSuccess! Uploaded policy: app
Next, create a new token:
bash-4.4# vault token create -policy=appKey Value --- ----- token c25e3c6e-e726-645b-0b0d-8054d2c4cdb0token_accessor a948a7f2-e01e-9c1d-4b28-0f4d53a4cfdf token_duration 768h token_renewable true token_policies ["app" "default"] identity_policies [] policies ["app" "default"]
Open another new terminal (this is the 3rd one), add the VAULT_TOKEN environment variable with the new token:
$ export VAULT_TOKEN=c25e3c6e-e726-645b-0b0d-8054d2c4cdb0
To read the foo secret that we previously set:
$ curl \ > -H "X-Vault-Token: $VAULT_TOKEN" \ > -X GET \ > http://127.0.0.1:8200/v1/secret/data/hello{"errors":["permission denied"]}
Why can't we even read it? Jump back to the policy config in app-policy.json. The secret/data/app/* indicates that the policy can only read from the app path:
{ "path": { "secret/data/app/*": { "policy": "read" } } }
Back within the bash session in the container, add a new secret to the app/test path:
bash-4.4# vault kv put secret/app/test ping=pongKey Value --- ----- created_time 2019-05-17T20:23:26.3645639Z deletion_time n/a destroyed false version 1
Now we should be able to view the secret using the token associated with the app policy:
$ curl \ > -H "X-Vault-Token: $VAULT_TOKEN" \ > -X GET \ > http://127.0.0.1:8200/v1/secret/data/app/test... { "data":{ "ping":"pong"}, "metadata":{ "created_time":"2019-05-17T20:23:26.3645639Z, "deletion_time":"", "destroyed":false, "version":1 } } ...
Policies can be managed via UI as well:
Refs
- Managing Secrets with Vault and Consul
- HashiCorp Docs
- Docker & Kubernetes : HashiCorp's Vault and Consul on minikube
- Docker & Kubernetes : HashiCorp's Vault and Consul - Auto-unseal using Transit Secrets Engine
- HashiCorp Vault and Consul on AWS with Terraform
- Code Repo: Docker-compose-Hashicorp-Vault-Consul

The DevOps Bootcamp 🚀 Newsletter
Join the newsletter to receive the latest updates in your inbox.

Lab 4/4 🔬Istio Ambiant Mesh
Paid
Members
Public
Ambient interoperability with sidecarsAll the Pods don't need to use the new Ambient mode. You can have some Pods using sidecars while others are using Ambient. Let's create a new namespace called httpbin: kubectl create namespace httpbinTo use sidecars in this namespace, you need to label it accordingly: kubectl label

Lab 3/4 🔬Istio Ambiant Mesh
Paid
Members
Public
L7 authorization policiesL4 policies are useful but may not be sufficient for your needs. For example, you’ll be able to send any request to the web-api service from the sleep pod while you may only want to allow requests with the GET method. In order to have any L7