

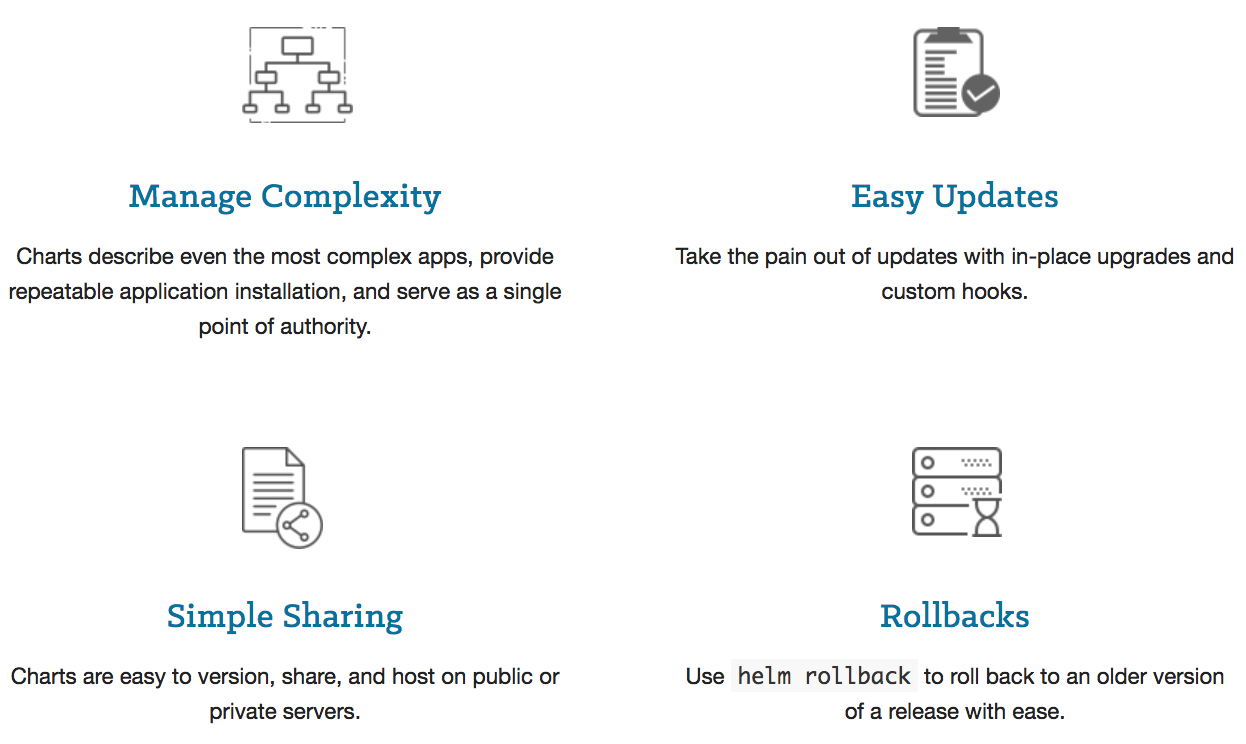
Helm package manager for Kubernetes
Define, install, upgrade and share even the most complex Kubernetes application using Helm package manager.
What is Helm?
Helm is a package manager for Kubernetes. It packages Kubernetes yaml files into a chart. The chart is usually pushed into Helm repositories.
For Kubernetes, it is equivalent to yum, apt, or homebrew. There are great and Kubernetes ready apps in public repository waiting for us to use.
Helm charts are packages of pre-configured Kubernetes resources. A Helm chart describes how to manage a specific application on Kubernetes.
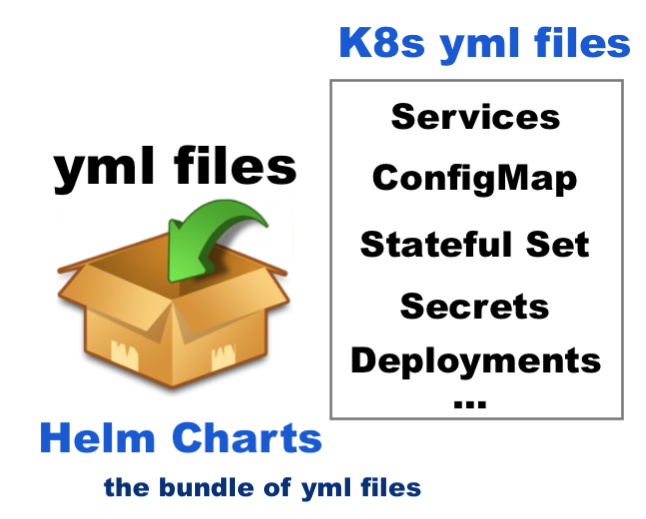
It consists of metadata that describes the application, plus the infrastructure needed to operate it in terms of the standard Kubernetes primitives. Each chart references one or more container images that contain the application code to be run.
Helm charts contains at least these two elements:
- A description of the package (chart.yml).
- One or more templates, which contains Kubernetes manifest files.
Despite the fact we can run application containers using the Kubernetes command line (kubectl), the easiest way to run workloads in Kubernetes is using the ready-made Helm charts. Helm charts simply indicate to Kubernetes:
- how to perform the application deployment
- how to manage the container clusters
One other reason we need to use Helm is that it's a templating engine. Suppose we have several apps to deploy to Kubernetes cluster but when we look at the yaml files they are not that different from each other, probably, the app name and image name are the difference among all the yaml files. A typical sample looks like this:
apiVersion: v1
kind: Pod
metadata:
  name: my-app
spec:
  containers:
    - name: my-app-comtainer
      image: my-app-image
      port: 3000
Most of the value are the same. So, here are the things we can do with the templating engine:
- Define a common blueprint for all our microservices.
- Replacing the vaules dynamically.
- So, our yamls can be converted something like this:
apiVersion: v1
kind: Pod
metadata:
	name: {{ .Values.name }}
spec:
	containers:
	- name: {{ .Values.container.name }}
 	  image: {{ .Values.container.name }}
 	  port: {{ .Values.container.port }}
So, instead of having multiple yaml files, we have only one yaml file called vaules.yaml. We can replace the vaules during our build pipeline on the fly. As another use case, we can easily deploy our app to Kubernetes cluster across different environments such as dev, staging, and prod.
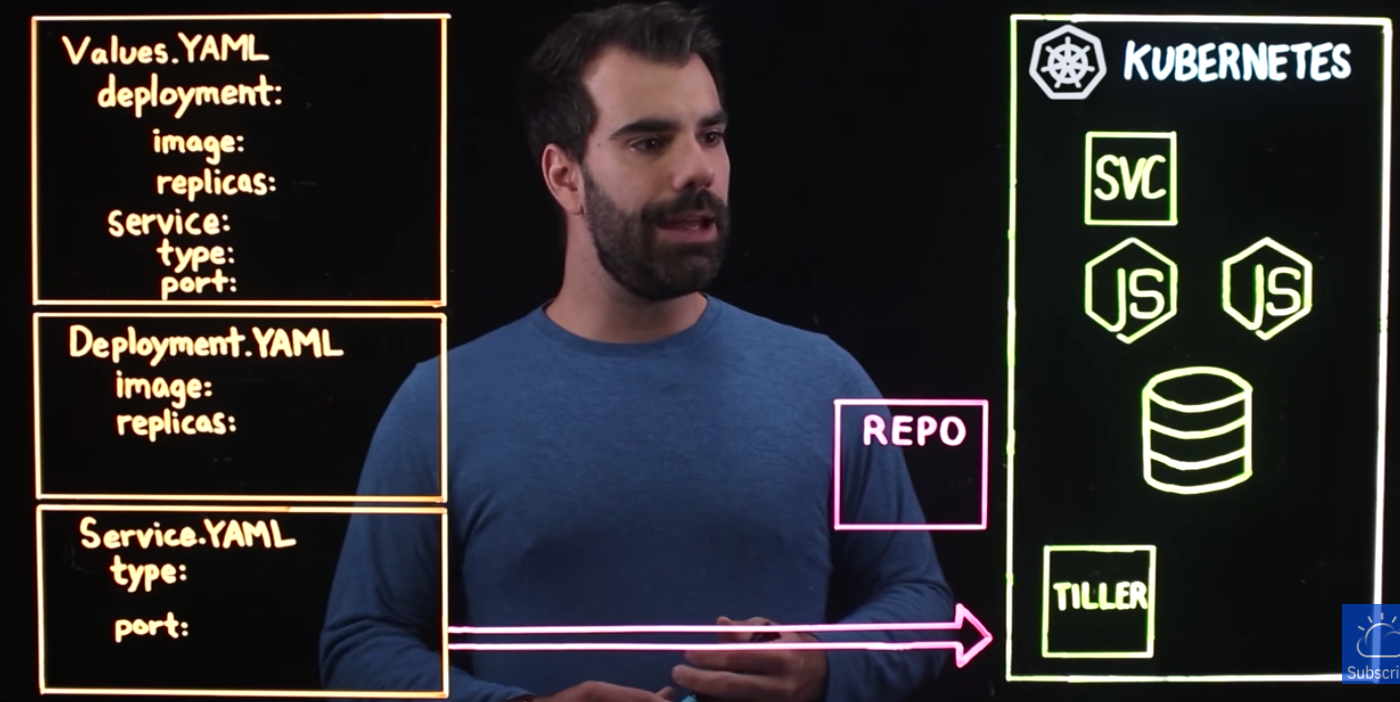
source: What is Helm?
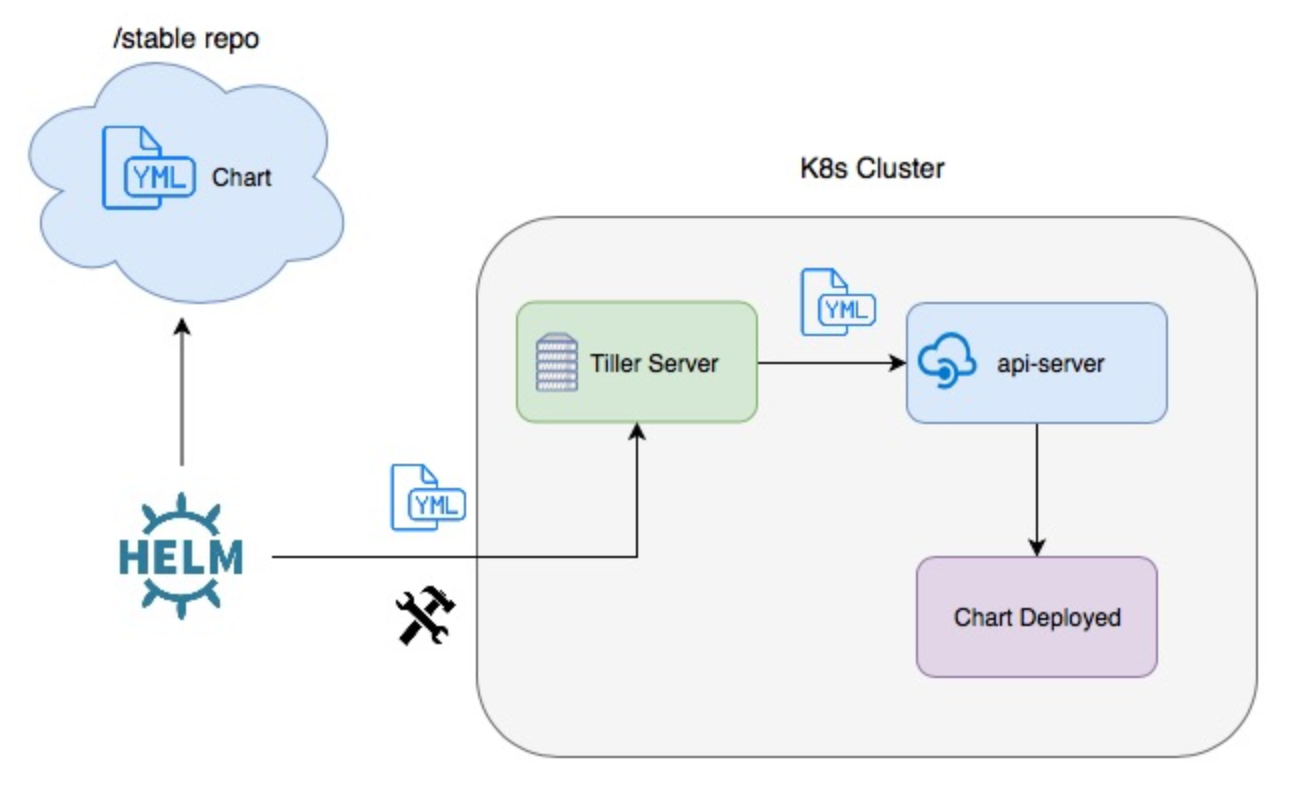
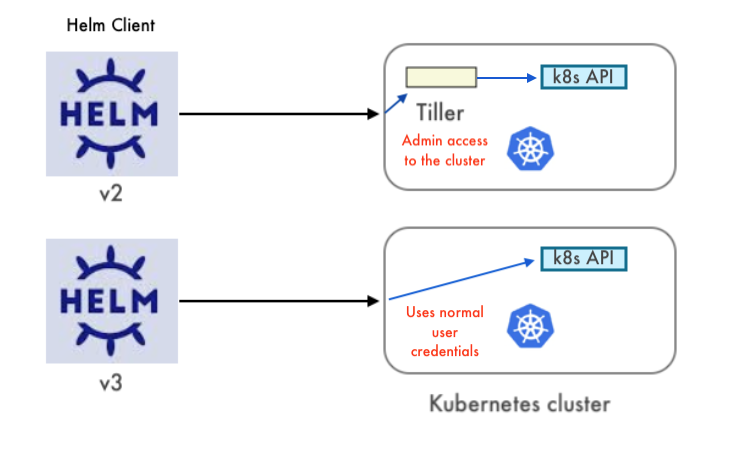
source: Packaging Applications for Kubernetes. Note the diagram applies only up to Helm 2 but not Helm 3.
In Helm 3, Tiller will be removed (Helm 3 Preview: Charting Our Future – Part 2: A Gentle Farewell to Tiller) because the tiller inside a K8s cluster has too much poewr such as CREATE/UPDATE/DELETE and it causes some security issues. So, the Helm 3 client library will communicate directly with the Kubernetes API server not via Tiller.
Terminology:
- Charts are the package format used by Helm. They define a set of resources to be deployed to a Kubernetes cluster. Functionally, charts are comparable to an apt, yum or homebrew.
- Repositories are locations where charts can be collected and distributed. They’re similar in function to apt or rpm repositories.
- A Releases represent an instance of a chart running in a Kubernetes cluster. If a chart is installed multiple times into the same Kubernetes cluster, it will be given a unique release with a corresponding name each time.
- In other words, Helm is used to install charts into Kubernetes clusters. The installation of a chart creates a release. To locate Helm charts for deployment, one would search a Helm chart repository.
Helm chart structure
Helem chart directory structure looks like this:
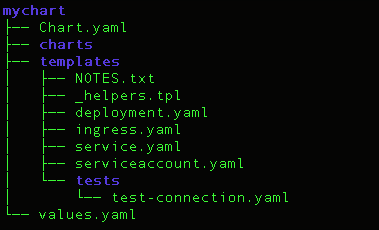
That's exactly the following command creates:
$ helm create mychart
Creating mychart- The top folder mychart: the name of the chart.
- Chart.yaml: meta info about the chart such as name, version, and dependencies etc.
- charts/ folder: There is initially empty and it allows us to add dependent charts that are needed to deploy our application.
- tempaltes/ folder: stores the actual yaml files.
Athelm install mychart, the template files will be filled with the values from values.yaml. The most important part of the chart is the template directory. It holds all the configurations for our application that will be deployed into the cluster. As we can see, this application has a basic deployment, ingress, service, and service account. This directory also includes a tests/ directory which includes a test for a connection into the app. - values.yaml: values for the template files. The template files collect deployment information from this values.yaml file. So, to customize our Helm chart, we need to edit the values file.
The default vaules can be overridden, for example:$ helm install --values=my-new-values.yaml mychart
Prerequisites
- Kubernetes must be installed. The latest stable release of Kubernetes is recommended since Kubernetes versions prior to 1.6 have limited or no support for role-based access controls (RBAC).
$ minikube start
Starting local Kubernetes v1.10.0 cluster...
Starting VM...
Getting VM IP address...
Moving files into cluster...
Setting up certs...
Connecting to cluster...
Setting up kubeconfig...
Starting cluster components...
Kubectl is now configured to use the cluster.
Loading cached images from config file.- Helm will figure out where to install Tiller by reading our Kubernetes configuration file ($HOME/.kube/config) which is the same file that kubectl uses.
- To find out which cluster Tiller would install to, we can run
$ kubectl config current-context
minikube

$ kubectl cluster-info
Kubernetes master is running at https://192.168.99.100:8443
CoreDNS is running at https://192.168.99.100:8443/api/v1/namespaces/kube-system/services/kube-dns:dns/proxy

To further debug and diagnose cluster problems, use 'kubectl cluster-info dump'.- We'll mostly use Helm v2 and then v3 in later sections of this post.
Install Helm
There are two parts to Helm: The Helm client and the Tiller server.
To install Helm on MacOS:
$ brew install kubernetes-helm

$ helm version
Client: &version.Version{SemVer:"v2.16.10", GitCommit:"bceca24a91639f045f22ab0f41e47589a932cf5e", GitTreeState:"clean"}
Error: could not find tiller
The easiest way to install tiller into the cluster is simply to run helm init. This will validate that helm's local environment is set up correctly (and set it up if necessary).
$ helm init
$HELM_HOME has been configured at /Users/kihyuckhong/.helm.

Tiller (the Helm server-side component) has been installed into your Kubernetes Cluster.

Please note: by default, Tiller is deployed with an insecure 'allow unauthenticated users' policy.
To prevent this, run `helm init` with the --tiller-tls-verify flag.
For more information on securing your installation see: https://v2.helm.sh/docs/securing_installation/
Note that we just setup the helm backend (Tiller) as a deployment on our minikube instance and it will connect to whatever cluster kubectl connects to by default (kubectl config view).
$ kubectl config view
apiVersion: v1
clusters:
- cluster:
    certificate-authority: /Users/kihyuckhong/.minikube/ca.crt
    server: https://192.168.99.100:8443
  name: minikube
contexts:
- context:
    cluster: minikube
    user: minikube
  name: minikube
current-context: minikube
kind: Config
preferences: {}
users:
- name: minikube
  user:
    client-certificate: /Users/kihyuckhong/.minikube/client.crt
    client-key: /Users/kihyuckhong/.minikube/client.key
Now that we confirmed kubectl is pointed at our minikube.
Once it connects, it will install tiller into the kube-system namespace.
After helm init, we should be able to run kubectl get pods --namespace kube-system and see Tiller running.
$ kubectl get pods --namespace kube-system
NAME                                        READY   STATUS    RESTARTS   AGE
...
tiller-deploy-6fd8d857bc-8pj74              1/1     Running   1          10h
Once Tiller is installed, running helm version should show us both the client and server version:
$ helm version
Client: &version.Version{SemVer:"v2.16.10", GitCommit:"bceca24a91639f045f22ab0f41e47589a932cf5e", GitTreeState:"clean"}
Server: &version.Version{SemVer:"v2.16.10", GitCommit:"bceca24a91639f045f22ab0f41e47589a932cf5e", GitTreeState:"clean"}
Just to make sure, let's verify again if our Tiller is setup properly as a deployment on our minikube instance:
$ kubectl describe deploy tiller-deploy --namespace=kube-system
Name:                   tiller-deploy
Namespace:              kube-system
CreationTimestamp:      Mon, 05 Oct 2020 15:19:03 -0700
Labels:                 app=helm
                        name=tiller
Annotations:            deployment.kubernetes.io/revision: 2
Selector:               app=helm,name=tiller
Replicas:               1 desired | 1 updated | 1 total | 1 available | 0 unavailable
StrategyType:           RollingUpdate
MinReadySeconds:        0
RollingUpdateStrategy:  25% max unavailable, 25% max surge
Pod Template:
  Labels:           app=helm
                    name=tiller
  Service Account:  tiller
  Containers:
   tiller:
    Image:       gcr.io/kubernetes-helm/tiller:v2.16.10
    Ports:       44134/TCP, 44135/TCP
    Host Ports:  0/TCP, 0/TCP
    Liveness:    http-get http://:44135/liveness delay=1s timeout=1s period=10s #success=1 #failure=3
    Readiness:   http-get http://:44135/readiness delay=1s timeout=1s period=10s #success=1 #failure=3
    Environment:
      TILLER_NAMESPACE:    kube-system
      TILLER_HISTORY_MAX:  0
    Mounts:                <none>
  Volumes:                 <none>
Conditions:
  Type           Status  Reason
  ----           ------  ------
  Available      True    MinimumReplicasAvailable
  Progressing    True    NewReplicaSetAvailable
OldReplicaSets:  <none>
NewReplicaSet:   tiller-deploy-76989fbdf6 (1/1 replicas created)
Events:
  Type    Reason             Age   From                   Message
  ----    ------             ----  ----                   -------
  Normal  ScalingReplicaSet  45m   deployment-controller  Scaled up replica set tiller-deploy-76989fbdf6 to 1
  Normal  ScalingReplicaSet  44m   deployment-controller  Scaled down replica set tiller-deploy-6fd89dcdc6 to 0
At this point, helm cli configured to use minikube tiller has been setup and deployed to minikube to interact with the k8s api!
Helm install = deploying a package to K8s cluster
To deploy a new package to our cluster, use the helm install command. At its simplest, it takes only one argument: the name of the chart. In this section, we'll use a chart from the repo.
$ helm repo list
NAME  	URL
stable	https://kubernetes-charts.storage.googleapis.com
local 	http://127.0.0.1:8879/charts

$ helm search mariadb
NAME             	CHART VERSION	APP VERSION	DESCRIPTION
stable/mariadb   	7.3.14       	10.3.22    	DEPRECATED Fast, reliable, scalable, and easy to use open...
stable/phpmyadmin	4.3.5        	5.0.1      	DEPRECATED phpMyAdmin is an mysql administration frontend
Let's deploy the stable/mariadb:
$ helm install stable/mariadb
NAME:   limping-arachnid
LAST DEPLOYED: Sat Dec 29 19:27:00 2018
NAMESPACE: default
STATUS: DEPLOYED

RESOURCES:
==> v1beta1/StatefulSet
NAME                             DESIRED  CURRENT  AGE
limping-arachnid-mariadb-master  1        1        1s
limping-arachnid-mariadb-slave   1        1        1s

==> v1/Pod(related)
NAME                               READY  STATUS   RESTARTS  AGE
limping-arachnid-mariadb-master-0  0/1    Pending  0         0s
limping-arachnid-mariadb-slave-0   0/1    Pending  0         0s

==> v1/Secret
NAME                      TYPE    DATA  AGE
limping-arachnid-mariadb  Opaque  2     1s

==> v1/ConfigMap
NAME                             DATA  AGE
limping-arachnid-mariadb-master  1     1s
limping-arachnid-mariadb-slave   1     1s
limping-arachnid-mariadb-tests   1     1s

==> v1/Service
NAME                            TYPE       CLUSTER-IP      EXTERNAL-IP  PORT(S)   AGE
limping-arachnid-mariadb        ClusterIP  10.100.79.71           3306/TCP  1s
limping-arachnid-mariadb-slave  ClusterIP  10.106.148.138         3306/TCP  1s


NOTES:

Please be patient while the chart is being deployed

Tip:

  Watch the deployment status using the command: kubectl get pods -w --namespace default -l release=limping-arachnid

Services:

  echo Master: limping-arachnid-mariadb.default.svc.cluster.local:3306
  echo Slave:  limping-arachnid-mariadb-slave.default.svc.cluster.local:3306

Administrator credentials:

  Username: root
  Password : $(kubectl get secret --namespace default limping-arachnid-mariadb -o jsonpath="{.data.mariadb-root-password}" | base64 --decode)

To connect to your database:

  1. Run a pod that you can use as a client:

      kubectl run limping-arachnid-mariadb-client --rm --tty -i --image  docker.io/bitnami/mariadb:10.1.37 --namespace default --command -- bash

  2. To connect to master service (read/write):

      mysql -h limping-arachnid-mariadb.default.svc.cluster.local -uroot -p my_database

  3. To connect to slave service (read-only):

      mysql -h limping-arachnid-mariadb-slave.default.svc.cluster.local -uroot -p my_database

To upgrade this helm chart:

  1. Obtain the password as described on the 'Administrator credentials' section and set the 'rootUser.password' parameter as shown below:

      ROOT_PASSWORD=$(kubectl get secret --namespace default limping-arachnid-mariadb -o jsonpath="{.data.mariadb-root-password}" | base64 --decode)
      helm upgrade limping-arachnid stable/mariadb --set rootUser.password=$ROOT_PASSWORD
During installation, the helm client will print useful information about which resources were created, what the state of the release is, and also whether there are additional configuration steps we can or should take.
Now the mariadb chart is installed. Note that installing a chart creates a new release object. The release above is named limping-arachnid. (If we want to use our own release name, we can simply use the --name flag on helm install.)
Helm does not wait until all of the resources are running before it exits. To keep track of a release's state, or to re-read configuration information, we can use helm status:
$ helm status limping-arachnid
Helm delete - Deleting a release
When it is time to uninstall or delete a release from the cluster, use the helm delete command:
$ helm delete limping-arachnid
release "limping-arachnid" deleted
This will remove the release from the cluster. We can see all of our currently deployed releases with the helm list command:
$ helm list
As we can see from the output above, the limping-arachnid release was deleted.
However, Helm always keeps records of what releases happened. Need to see the deleted releases? helm list --deleted shows those, and helm list --all shows all of the releases (deleted and currently deployed, as well as releases that failed):
$ helm list --deleted
NAME            	REVISION	UPDATED                 	STATUS 	CHART            	APP VERSION	NAMESPACE
limping-arachnid	1       	Sat Dec 29 19:27:00 2018	DELETED	mariadb-5.2.3    	10.1.37    	default
my-release      	1       	Fri Dec 28 09:29:04 2018	DELETED	ambassador-0.40.2	0.40.2     	default

$ helm list --deleted
Helm install from the filesystem with a release name
Using Helm repositories is a recommended practice (Helm repositories are optional), however, we can deploy a Helm chart to a Kubernetes cluster directly from the filesystem. There is no requirement that a Helm chart must be uploaded to a Helm repository before being deployed to a cluster.
Let's play with our initial chart (mychart) which Helm creates an nginx deployment, by default. Note that we create the chart earlier with the helm create command:
$ helm create mychart We will use NodePort service type, so we need to change the value in mychart/values.yaml for the service type:
From:
service:
  type: ClusterIP
To:
service:
  type: NodePort
Deploy the package:
$ helm install mychart -n bogo
NAME:   bogo
LAST DEPLOYED: Sat Sep  5 22:49:47 2020
NAMESPACE: default
STATUS: DEPLOYED

RESOURCES:
==> v1/Deployment
NAME          READY  UP-TO-DATE  AVAILABLE  AGE
bogo-mychart  0/1    1           0          0s

==> v1/Pod(related)
NAME                           READY  STATUS             RESTARTS  AGE
bogo-mychart-68f985f5c4-7tpk5  0/1    ContainerCreating  0         0s

==> v1/Service
NAME          TYPE      CLUSTER-IP    EXTERNAL-IP  PORT(S)       AGE
bogo-mychart  NodePort  10.99.140.91         80:32660/TCP  0s

==> v1/ServiceAccount
NAME          SECRETS  AGE
bogo-mychart  1        0s


NOTES:
1. Get the application URL by running these commands:
  export NODE_PORT=$(kubectl get --namespace default -o jsonpath="{.spec.ports[0].nodePort}" services bogo-mychart)
  export NODE_IP=$(kubectl get nodes --namespace default -o jsonpath="{.items[0].status.addresses[0].address}")
  echo http://$NODE_IP:$NODE_PORT

$ kubectl get all
NAME                                READY   STATUS    RESTARTS   AGE
pod/bogo-mychart-68f985f5c4-7tpk5   1/1     Running   0          35s

NAME                   TYPE        CLUSTER-IP     EXTERNAL-IP   PORT(S)        AGE
service/bogo-mychart   NodePort    10.99.140.91           80:32660/TCP   35s
service/kubernetes     ClusterIP   10.96.0.1              443/TCP        28h

NAME                           READY   UP-TO-DATE   AVAILABLE   AGE
deployment.apps/bogo-mychart   1/1     1            1           35s

NAME                                      DESIRED   CURRENT   READY   AGE
replicaset.apps/bogo-mychart-68f985f5c4   1         1         1       35s
The minikube service command will open a browser for us:
$ minikube service bogo-mychart
|-----------|--------------|-------------|-------------------------|
| NAMESPACE |     NAME     | TARGET PORT |           URL           |
|-----------|--------------|-------------|-------------------------|
| default   | bogo-mychart | http/80     | http://172.17.0.2:32660 |
|-----------|--------------|-------------|-------------------------|
Starting tunnel for service bogo-mychart.
|-----------|--------------|-------------|------------------------|
| NAMESPACE |     NAME     | TARGET PORT |          URL           |
|-----------|--------------|-------------|------------------------|
| default   | bogo-mychart |             | http://127.0.0.1:57814 |
|-----------|--------------|-------------|------------------------|
Opening service default/bogo-mychart in default browser...
Because you are using a Docker driver on darwin, the terminal needs to be open to run it.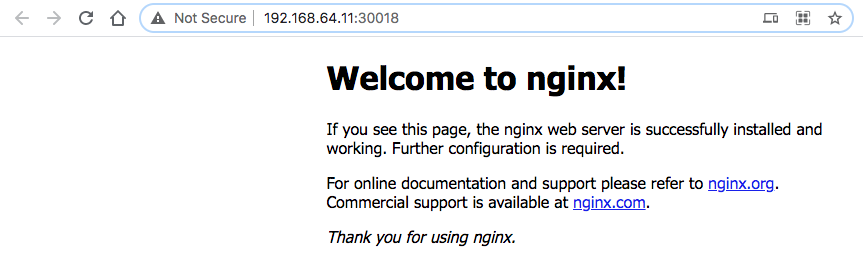
We can check the release:
$ helm ls
NAME	REVISION	UPDATED                 	STATUS  	CHART        	APP VERSION	NAMESPACE
bogo	1       	Sat Sep  5 22:49:47 2020	DEPLOYED	mychart-0.1.0	1.0        	default
To delete the release:
$ helm del bogo
release "bogo" deleted

$ helm ls
Install Helm3 and Helm2
We may want to have both versions of Helm on our Mac since some applications do no support v3 yet. To update an application installed with Helm v2 needs to be uninstalled with Helm v2, and then reinstalled with Helm v3.
$ brew uninstall helm
$ brew install helm@2
$ brew install helm

$ ln -s /usr/local/opt/helm@2/bin/tiller /usr/local/bin/tiller
$ ln -s /usr/local/opt/helm@2/bin/helm /usr/local/bin/helm2
$ ls -s /usr/local/opt/helm/bin/helm /usr/local/bin/helm
Chect the versions:
$ helm2 version
Client: &version.Version{SemVer:"v2.16.10", GitCommit:"bceca24a91639f045f22ab0f41e47589a932cf5e", GitTreeState:"clean"}
Server: &version.Version{SemVer:"v2.16.10", GitCommit:"bceca24a91639f045f22ab0f41e47589a932cf5e", GitTreeState:"clean"}

$ helm version
version.BuildInfo{Version:"v3.3.1", GitCommit:"249e5215cde0c3fa72e27eb7a30e8d55c9696144", GitTreeState:"dirty", GoVersion:"go1.15"}
Deploying MySQL using Helm v3
- To create new chart named mysql:
$ helm create mysql
Creating mysql

$ tree mysql
mysql
├── Chart.yaml
├── charts
├── templates
│   ├── NOTES.txt
│   ├── _helpers.tpl
│   ├── deployment.yaml
│   ├── hpa.yaml
│   ├── ingress.yaml
│   ├── service.yaml
│   ├── serviceaccount.yaml
│   └── tests
│       └── test-connection.yaml
└── values.yaml- Helm, by default, creates an nginx deployment. We're going to customize it to create a Helm Chart to deploy mysql on Kubernetes cluster. Also, we'll add new deployment (mysql/templates/deployment.yaml):
apiVersion: apps/v1
kind: Deployment
metadata:
  name: {{ include "mysql.fullname" . }}
spec:
  selector:
    matchLabels:
      app: {{ include "mysql.name" . }}
  template:
    metadata:
      labels:
        app: {{ include "mysql.name" . }}
    spec:
      containers:
      - name: {{ .Chart.Name }}
        image: "{{ .Values.image.repository }}:{{ .Values.image.tag }}"
        imagePullPolicy: {{ .Values.image.pullPolicy }}
        env:
        - name: MYSQL_ROOT_PASSWORD
          value: {{ .Values.mysql_root_password }}
        ports:
        - containerPort: {{ .Values.service.port }}
          name: mysql
      volumes:
      - name: mysql-persistent-storage
        persistentVolumeClaim:
claimName: {{ .Values.persistentVolumeClaim }}- Also, we need to create PVC which is used in deployment (mysql/templates/persistentVolumeClaim.yaml):
apiVersion: v1
kind: PersistentVolumeClaim
metadata:
  name: {{ .Values.persistentVolumeClaim }}
spec:
  accessModes:
    - ReadWriteOnce
  resources:
    requests:
storage: 1Gi - Helm runs each file in the templates/ directory through Go template rendering engine. Now, we want to create mysql/templates/service.yaml to connect to the mysql instance:
apiVersion: v1
kind: Service
metadata:
  name: {{ include "mysql.fullname" . }}
spec:
  ports:
  - port: {{ .Values.service.port }}
  selector:
    app: {{ include "mysql.name" . }}
clusterIP: None - It's time to update mysql/values.yaml to populate the chart's templates:
# Default values for mysql.
# This is a YAML-formatted file.
# Declare variables to be passed into your templates.

image:
  repository: mysql
  tag: 5.6
  pullPolicy: IfNotPresent

nameOverride: ""
fullnameOverride: ""

serviceAccount:
  # Specifies whether a service account should be created
  create: false
  # The name of the service account to use.
  # If not set and create is true, a name is generated using the fullname template
  name:

mysql_root_password: password

service:
  type: ClusterIP
  port: 3306

persistentVolumeClaim: mysql-data-disk

ingress:
  enabled: false
  annotations: {}
    # kubernetes.io/ingress.class: nginx
    # kubernetes.io/tls-acme: "true"
  hosts:
    - host: chart-example.local
      paths: []

  tls: []
  #  - secretName: chart-example-tls
  #    hosts:
  #      - chart-example.local

autoscaling:
  enabled: false

resources: {}
  # We usually recommend not to specify default resources and to leave this as a conscious
  # choice for the user. This also increases chances charts run on environments with little
  # resources, such as Minikube. If you do want to specify resources, uncomment the following
  # lines, adjust them as necessary, and remove the curly braces after 'resources:'.
  # limits:
  #   cpu: 100m
  #   memory: 128Mi
  # requests:
  #   cpu: 100m
# memory: 128Mi- Here is the updated directory structure:
$ tree mysql
mysql
├── Chart.yaml
├── charts
├── templates
│   ├── NOTES.txt
│   ├── _helpers.tpl
│   ├── deployment.yaml
│   ├── hpa.yaml
│   ├── ingress.yaml
│   ├── persistentVolumeClaim.yaml
│   ├── service.yaml
│   ├── serviceaccount.yaml
│   └── tests
│      └── test-connection.yaml
└── values.yaml - Render the chart templates locally and check if everything is correct:
$ helm template mysql
---
# Source: mysql/templates/persistentVolumeClaim.yaml
apiVersion: v1
kind: PersistentVolumeClaim
metadata:
  name: mysql-data-disk
spec:
  accessModes:
    - ReadWriteOnce
  resources:
    requests:
      storage: 1Gi
---
# Source: mysql/templates/service.yaml
apiVersion: v1
kind: Service
metadata:
  name: RELEASE-NAME-mysql
spec:
  ports:
  - port: 3306
  selector:
    app: mysql
  clusterIP: None
---
# Source: mysql/templates/deployment.yaml
apiVersion: apps/v1
kind: Deployment
metadata:
  name: RELEASE-NAME-mysql
spec:
  selector:
    matchLabels:
      app: mysql
  template:
    metadata:
      labels:
        app: mysql
    spec:
      containers:
      - name: mysql
        image: "mysql:5.6"
        imagePullPolicy: IfNotPresent
        env:
        - name: MYSQL_ROOT_PASSWORD
          value: password
        ports:
        - containerPort: 3306
          name: mysql
      volumes:
      - name: mysql-persistent-storage
        persistentVolumeClaim:
          claimName: mysql-data-disk
---
# Source: mysql/templates/tests/test-connection.yaml
apiVersion: v1
kind: Pod
metadata:
  name: "RELEASE-NAME-mysql-test-connection"
  labels:
    helm.sh/chart: mysql-0.1.0
    app.kubernetes.io/name: mysql
    app.kubernetes.io/instance: RELEASE-NAME
    app.kubernetes.io/version: "1.16.0"
    app.kubernetes.io/managed-by: Helm
  annotations:
    "helm.sh/hook": test-success
spec:
  containers:
    - name: wget
      image: busybox
      command: ['wget']
      args: ['RELEASE-NAME-mysql:3306']
restartPolicy: Never- Execute the
helm installcommand to deploy our mysql chart in the Kubernetes cluster:
helm install [NAME] [CHART] [flags]
$ helm install mysql-rel mysql
NAME: mysql-rel
LAST DEPLOYED: Sun Sep  6 16:16:45 2020
NAMESPACE: default
STATUS: deployed
REVISION: 1
NOTES:
1. Get the application URL by running these commands:
  export POD_NAME=$(kubectl get pods --namespace default -l "app.kubernetes.io/name=mysql,app.kubernetes.io/instance=mysql-rel" -o jsonpath="{.items[0].metadata.name}")
  echo "Visit http://127.0.0.1:8080 to use your application"
  kubectl --namespace default port-forward $POD_NAME 8080:80
We can get a bash shell running in the MySQL container and take a look around. Just exec bash against the mysql pod:
$ kubectl exec -it  mysql-rel-7557ff844d-9rhdh -- bash
root@mysql-rel-7557ff844d-9rhdh:/#
Note that installing a Helm chart creates a new release object, in our case, it is named mysql-rel. To check the state:
$ helm status mysql-rel
NAME: mysql-rel
LAST DEPLOYED: Sun Sep  6 16:16:45 2020
NAMESPACE: default
STATUS: deployed
REVISION: 1
... - To do an install or an upgrade, we can use
helm upgradecommand:
$ helm upgrade --install mysql-rel mysql
Release "mysql-rel" has been upgraded. Happy Helming!
NAME: mysql-rel
LAST DEPLOYED: Sun Sep  6 17:40:36 2020
NAMESPACE: default
STATUS: deployed
REVISION: 2
NOTES:
1. Get the application URL by running these commands:
  export POD_NAME=$(kubectl get pods --namespace default -l "app.kubernetes.io/name=mysql,app.kubernetes.io/instance=mysql-rel" -o jsonpath="{.items[0].metadata.name}")
  echo "Visit http://127.0.0.1:8080 to use your application"
  kubectl --namespace default port-forward $POD_NAME 8080:80

$ helm ls
NAME     	NAMESPACE	REVISION	UPDATED                            	STATUS  	CHART      	APP VERSION
mysql-rel default 2 2020-09-06 17:40:36.90264 -0700 PDT deployed mysql-0.1.0 1.16.0- To clean everything up, we can delete the release:
$ helm del mysql-rel
release "mysql-rel" uninstalled

$ helm ls
NAME	NAMESPACE	REVISION	UPDATED	STATUS	CHART	APP VERSION
https://www.bogotobogo.com/DevOps/Docker/Docker_Helm_Chart.php

The DevOps Bootcamp 🚀 Newsletter
Join the newsletter to receive the latest updates in your inbox.
Lab 4/4 🔬Istio Ambiant Mesh
Paid
Members
Public
Ambient interoperability with sidecarsAll the Pods don't need to use the new Ambient mode. You can have some Pods using sidecars while others are using Ambient. Let's create a new namespace called httpbin: kubectl create namespace httpbinTo use sidecars in this namespace, you need to label it accordingly: kubectl label

Lab 3/4 🔬Istio Ambiant Mesh
Paid
Members
Public
L7 authorization policiesL4 policies are useful but may not be sufficient for your needs. For example, you’ll be able to send any request to the web-api service from the sleep pod while you may only want to allow requests with the GET method. In order to have any L7